Thursday, September 30, 2010

Wild Tree's Alfredo Extraordinaire

Wild Tree was introduced to me by my fellow foodie cousin Debra.  It is similar to other at home party food items but it is not loaded with preservatives, MSG, food dyes and things you cannot pronounce.  They sell items that are packaged but without all of the things you hate about packaged food.  You can visit the website at http://www.wildtree.com/.

I bought a lot of samples on EBay for very little money.  EBay is a great way to try these items.  The first item I tried in the lot was the Alfredo Extraordinaire.


 I bought a few of these so I used 2.  Each of the samples required 5 TBS of butter and 1/2 cup of milk or a combo of milk and half and half.  It is simple.

Melt the butter and heat the milk in the butter


 Add the Alfredo Extraordinaire packet and stir until combined. 


Cook 8 oz (half pound) of linguine.


Add the cooked linguine into the pan with the Alfredo Extraordinaire.  It is OK if a little pasta water gets in, it makes the sauce a bit thinner.                   


I added a bit of chicken I cooked in the oven.  I took thick chicken breasts, cut them in half horizontally, placed them on a cookie sheet with olive oil, salt and pepper. Bake for 15-20 minutes at 350.  Cut it up and place on top.  I think you could thrown in some fresh spinach or mushrooms too.                     


Overall, this was a simple dinner.  The Alfredo sauce was very tasty.  It was full of flavor and had a thick texture.  The pasta water helped to make it exactly right.  The hubby thought it was a bit grainy but that is likely from not incorporating the mix into the butter and milk mixture.  Everyone else thought it was good.  I would make it again for two reasons - it was good and it was easy.  I am always looking for a quick week night meal and this is it.  In 20 minutes you can have a complete meal that is good for you.  I would recommend this product from Wild Tree.  I look forward to trying the other products.

Last Day of September 2010 Harvest

Today was the last day of September and we are a week into the autumn harvest season.  This has been a rainy week but it was needed.  I picked more cherry and green zebra tomatoes.  Good-bye September...til next year.  You have been good to my garden. 


2 Green Zebra, 1 Green Pepper, 44 Cherry Tomatoes


Oatmeal Raisin Cookies

My brother's favorite cookie is Oatmeal Raisin.  Since fall is here and maple syrup is in season, I decided to make some.  I make the cookies with some organic ingredients:  Organic Oats from Whole Foods that I get in the bulk bins for $1.19 per pound; Organic Butter; Organic Whole Foods 365 AP Flour; Organic Whole Foods 365 Brown Sugar; and Organic Eggs.  The Maple Syrup is from Vermont. It is brought back by friends who go there on ski trips.  Since it is local from there and brought back by people who are coming here anyway, I consider it a local good for me.  The salt, baking powder and cinnamon and raisin are all from Whole Foods.  It is not 100% Organic or local but it goes a long way in achieving those goals.

When I bake, I almost always triple the recipe.  It takes the same amount of time to make the dough but longer to bake each cookie sheet.  I like to have lots of cookies - some for home, some for work and some for the freezer for later.  The recipe below is for one batch but can easily be doubled or tripled

I use a recipe that have altered.  The original is from Martha Stewart's "Baking Handbook.  I do not add the coconut and cook them at a higher temperature.

Here is the recipe as altered:

1 1/2 cups All Purpose flour
1 tsp ground cinnamon
1 tsp baking soda
1 tsp salt
2 sticks unsalted butter, softened
1 cup packed light brown sugar
1/3 pure maple syrup
1 large egg
2 tsp pure vanilla extract
3 cups old-fashioned rolled oats
1 cup raisins

Preheat oven to 350 degrees. 

Combine flour, cinnamon, baking soda and salt in a large bowl and whisk together.  Set aside.


Place butter and brown sugar into the bowl of a mixer.  Beat them together for 3-4 minutes until light and fluffy. 


Add the maple syrup and mix to combine.  Add egg and vanilla, beat until combined.


 Add the flour mixture to the mixer bowl in 2 batches, until just combined.


Add the oats and raisins.  Mix until combined.

Scoop the dough onto the cookie sheets in 1 1/2 inch balls. 


Bake for 20 minutes.  Turn the sheets halfway through baking.  Remove from oven, then place cookies on a wire rack to cool. 


 Tips:

Use parchment paper on the sheets to make it easier to clean up and to remove the cookies from the cookie sheet to the wire racks.

Use a cookie scoop to make the cookies all the same size and will all cook evenly.

Use Grade B maple syrup if you can find it.  I never can so I use Grade A and they are still good.

Wednesday, September 29, 2010

Green Beans!

I thought the green beans were long over.  I went to the plants to pull them out and was surprised to see the plants still bearing beans...some were really long.   I had no realized that they were still growing so I stopped checking on them.  I am glad I looked at them before pulling them out because I was able to pick 12 ounces (3/4 of a pound).  I blanched them and put them into the freezer for the winter.  I now have 3 full one gallon Ziploc freezer bags in the freezer for the winter.  That is pretty good for a $2 pack of seeds.  They were easy to grow and gave up without much effort. 

The variety I grew is called Tendergreen Bush Bean.  They need no staking which makes them easy to grow and to pick from.  I bought them from Seeds of Change and would grow them again.  I planted the seeds the week of May 17, 2010 and they were growing well and I picked my first pound of green beans on July 6, 2010.  Since then they have continued to grow and give.  I doubt there will be any more to pick this season but it was a wonderful surprise.  Picking the beans reminded me of why I garden  - the pleasure of seeing something hiding behind the leaves that you never thought you would find.  You work hard in the spring to get the beds ready and when you get one more harvest it is a great satisfying feeling and makes all of the hard work worth it.  The disappointments are many but one simple joyous moment makes it all worth it.

Here is the pick from today.


12 oz. Green Beans, 3 Cubanelle Peppers and 29 Cherry Tomatoes

Tuesday, September 28, 2010

2 Rainy Day Harvests

This week is forecasted to be rainy and then the weekend is supposed to be the beginning of autumn weather...I just hope the frosts and freeze stay away at night so I can continue to harvest.  The rain is welcome after such a long dry summer.  The garden is slowing down however.  The bed will need to be put to bed soon.  But as long at it continues to give I will continue to pick. 

Monday and Tuesday's harvest have continued to do well.  I am still picking Green Zebras and Cherry Tomatoes.  The Green Bell Peppers are growing well.  The plants never grew and are small but the fruit is coming in at this late stage of the season.. I was able to pick one.


Monday - one HUGE Arkansas Traveler and 35 Cherry


One Green Bell Pepper, 6 Green Zebras, 25 Cherry


Sunday, September 26, 2010

Green Zebras and Cherry Tomatoes Continue to Flourish

I picked this evening and found just Green Zebras and Cherry Tomatoes.  There was one lone Arkansas Traveler that was huge.  I am still searching for a recipe for these Zebras.

Davis Peach Farm

Davis Peach Farm is an icon for those who live on the North Shore of the Town of Brookhaven.  Many people remember going to the peach farm in Mt. Sinai and picking peaches and other fruits.  But they have moved to Wading River.  And they are still growing great fruit here on the Long Island.  They are located just past East Wind Caterers.

The farm stand is on Sound Avenue on the corner of Hulse Landing.  We took a ride there to get some apples for our apple adventures.  The prices were great.  For apple sauce we needed "seconds."  These are the apples with nicks and bruises.  They had a whole table full of apples and other fruit for $3 for 3 Qts.  The other apples were $4 for 3 Qts.  We also had a 20% off coupon we found in a Long Island magazine. 

We spent $15 and got enough apples to feed an Army. 

The peaches, plums and other fruits were priced right too.  They sell pumpkins, veggies and pies made from their fruit.  

Across the street on Hulse Landing Rd. is the U-Pick orchard.  Stop by and pick some fruit and support your local farm.  Even though they moved they are still who you remember.

Apple Pie Filling

Making apple pie can take a while.  You have to skin, core and chop the apples.  Then make the pie crust.  Add apples and seasoning and bake.  Here is a method where you can make the filling now and use it later.  Or give it as a gift.  Here is the recipe.

Ingredients:

6 quarts apples:  peeled, cored and sliced
3 cups sugar
1 1/2 cups cornstarch or Clear Jel
1 TBS cinnamon
2 1/2 cups water
5 cups apple juice
3/4 cups lemon juice
1 lemon

Tools:

7 Quart Jars
Canning kit
2 Large pots
large bowl with water

Recipe:

Wash the apples.

Heat a large pot with water.  Throw in 1/2 lemon.

In the second pot add the sugar, cinnamon, water and apple juice.  Bring to a boil.  Once it boils, add Clear Jel or cornstarch, and lemon juice.  Bring back to a boil and let it boil for one minute. It should look like a thick syrup.

Peel, core and slice the apples.  Place them in a bowl with a half a squeezed lemon. 

Once the water in boiling, add the apples and cook for one minute.  Remove from the water.  Place the apples into quart jars that are prepared and sterilized.  They should be firmly packed.

Add the sugar syrup on top and leave 1 inch of head space.  Tamp it down to make sure all the space is filled up.  Water boil can for 25 minutes.  Remove and let sit upside down for one day.  Make sure the lids are sealed properly.


Use an apple peeler to make it go faster.


Then use a corer- slicer.  Use a knife to cut off remaining skins.

Place slices into lemon water to prevent browning

Blanch for 1 minute

Remove from water and place in a strainer


Make syrup mixture


Place apples in jars.  Pack well and fill with syrup.  Can.
Tips:
It should take 1 jar to make a small pie or 2 to make a large pie.  Do not use all the syrup in the pie or it will be too water-y.

Add the filling to a pie shell.  Cover with another pie crust.  Brush the crust with an egg wash and sprinkle with sugar.  Cut 5 slits on top to let the steam out.  Bake for one hour at 375 degrees, until golden brown and bubbly. 

Use baking apples not eating apples.  You want sweet apples.  Varieties include:

Jonathan, Stayman-Winesap, Cox's Orange Pippin, Jonagold, Braeburn, Fuji, Mutsu, Pink Lady, Suncrisp, Rome Beauty, and Empire.

I like to use a few tart apples such as a Granny Smith to add some tartness.  But only a few.

Clear Jel is a starch produce approved by the USDA for canning.  The USDA no longer recommends cornstarch but I have used it with good results.  I prefer Clear Jel.  I cannot find it in the local stores so I recommend Amazon.

Give one jar, a pie plate and a nice pie server as a gift with the recipe card attached.

Apple Sauce Recipe

Apple Sauce is a really easy to make.  The recipe consist of apples.  That's it.

Ingredients:

Apples - any kind and any amount you have

Tools:

Large pot
Food mill
Wooden Spoon
Potato Masher
Canning pot and tools

Directions:

Loosely chop the apples into quarters.  Keep the skins and seeds and eveything.  Throw all the apples in the pot with about 1/4 inch of water and cook down.  Once the apples have started to give up some liguid, use the wooden spoon to stir and prevent burning.  As the apples soften, use the potato masher to get the apples into a mashed mix. 

Once the mixture is softened, put it through the food mill.  Place the apple sauce into sterilized jars.  Use a water canner and process for 15 minutes. 

If you want it even easier, cut off all the skins, cut and core the apples before placing in the pot.  Cook and mash down as described above and then put it in the jars.  It is chunkier but easy and the kids can help.

There is no need to add sugar unless you want it to be sweet.  If you do, add sugar to taste.  You can add cinnamon to taste if you like that as well.  I like it just plain.

Here are the photos:


Apples cut and placed in pots with 1/4 water


Cooked for 10 minutes

Cooked for 20 minutes and mashed with spoon


Put through food mill


Skins left after sauce goes through the mill


All done and ready to put in jars


Sterlized in the dishwasher
Place in jars and leave 1/2 inch headspace
All jarred and ready to store for winter (or use in apple butter)
                                                 

Apple Butter Recipe

A friend of mine have me great recipe for Apple Butter.  It is simple to make but it takes a while. 


APPLE BUTTER

12 Granny Smith apples
2 cups apple cider
1-1/2 cups sugar
1 tsp cinnamon
½ tsp allspice


          Cook the apples and the cider until the apples are very soft.  Put the mixture through a food mill and add the sugar and spices.  Cook over low heat until the mixture reaches the desired consistency, about 2 hours.

          Wash the canning jars in hot water (or the dishwasher) and boil the lids and rings for 5 minutes in a pan. 

          Ladle the apple butter into the jars leaving approximately a ¼" space.  Put on the lids and rings and boil the jars in a large pot for 10 minutes.  Check when the jars are cooled to make sure that the lids have popped down. 

          If not canning, you can save the apple butter in the refrigerator for approximately two to three weeks or you can freeze the apple butter.

          This recipe makes approximately 7 jars (8oz).   


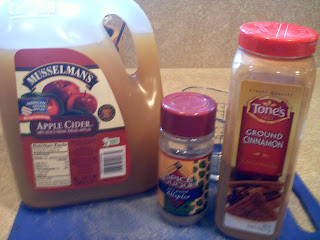
Add cider, sugar and spices to apple sauce (or spices to milled cider and apples)


Apple sauce, cider and spices added.

Cook down for 2 hours

Can and store.


Tips:

If you already have apple sauce made you can use that and start the recipe by adding the sugar, cider and spices and cooking from there.

If you are making this from apple sauce, place all the ingredients in the crock pot for 6 hrs on high or 10-12 on low.  Keep the lid slightly open so the water will evaporate out. 

Be careful with the mixture as it cooks down.  It splatters, is very hot and sticks to whatever it touches.  If it lands on you - it will burn.  If it lands on the stove - it will stick.

Use on toast or English Muffin.

Add to plain yogurt.

Saturday, September 25, 2010

Green Zebra Harvest

The cherry tomotoes have been the best crop of the season.  But the past three days have been all about the Green Zebra.  It was "the" tomato to grow this year.  Somehow even gardening has "must haves."  I picked 11 Green Zebras, 1 Cubanelle Pepper and 108 Cherry tomatoes.  This past week was in the 80s and the upcoming weekend is forecasted to be warm as well.  This will really help to ripen the tomatoes still on the vines outside.  I am so excited that my plants are still bearing fruit considering how late we are into September. 

Here is some info I found on Green Zebras:
Maturity      78 days
VineIndeterminate
Plant height9 feet
Fruit Weight6 oz
Leafregular
ColorBicolor: Green with yellow stripes
ShapeGlobe


My Green Zebra Harvest:


9/23/10 Harvest


9/24/10 Harvest
 
9/25/10 harvest
Now the question remains:  What do I make with them??

Thursday, September 23, 2010

Grocery Sales

Great deals this week:

Best Yet:

LOCAL NYS cucumbers - 3 for $1
Harvestland All Natural Chicken Drumsticks - $1.69 lb
LOCAL pumpkins - 39 cents lb
LOCAL NYS Gala Apples 3 lb bag - $1.99 each

King Kullen:

LOCAL NYS McIntosh or Empire Apple Tote Bags - 99 cents lb.

Pathmark:

LOCAL NYS Bosc Pears - 98 cents lb.
LOCAL NYS McIntosh or Gala Apple Totes - 99 cents lb

Stop and Shop:

Nature's Promise Whole Chicken - $1.39 lb
Nature's Promise Organic Milk 1/2 gallon - $3.29

Uncle Giuseppe's

Organic Cello Carrots 16 oz. - 99 cents
Organic Red or Green Grapes - $2.49 lb
Organic Extra Large Broccoli - $2.49 each

Waldbaums:

Marcal Small Steps 12 Double Rolls or 24 Regular Bathroom Tissue: $4.99 each
Marcal Small Steps Napkins - 2 for $4
Green Way Organic Milk one gallon - $5.99

Making Concord Grape Jam

After seeing those beautiful Concord Grapes at the farm stand I just knew I had to make some jam.  I used just the one quart I bought and here is the recipe:

Ingredients:

1.75 lbs Concord Grapes
1.5 cups sugar
2 teaspoons lemon juice

Tools:

Canning tools and pot
3 half pint jars or 6 jelly jars
Food processor
Strainer

Prepare a water bath canner.  Bring the pot to a boil and sanitize the jars and lids in the canner or dishwasher.  Keep the jars warm until jam is ready.  It should all be done at the same time.

Skin the grapes.  Place the skins in one bowl and the pulp (aka: inside of the grape and seeds) in another.  Discard the stems and any grapes that are bad.  Once all the grapes are done, place the skins in the food processor with 1/2 cup of sugar and process with the steel blade for 1-2 minutes until smooth.

Place grape pulp. 1 cup sugar, 2 tsp lemon juice and processed grape skins into a sauce pan.  Place pan onto the stove and bring mixture to a boil.  Lower the heat and simmer for 25 minutes, stirring occasionally to ensure it does not burn or stick to the bottom of the pot.

Once it has been cooked down, pour the mixture into a fine strainer placed over a bowl.  This may take more than one batch, depending on the size of your strainer.  Using a rubber spatula, push the liquid through.  Push on the pulp and seeds until it has all passed through the strainer and nothing is left but a bit of pulp and seeds.  This should take 10 minutes.  Use a clean spatula to scrape the remaining jam off of the bottom of the strainer and place that mixture into the bowl as well.  Discard the pulp-seed mixture.  Mix the jam that is now in the bowl and fill the prepared jars, leaving 1/2 inch of head space.  Place the filled jars into the water bath canner for 10 minutes.  Remove and place the jars upside down.  Store for 1 day in a draft free area.  Check to ensure the lids have processed and store for up to one year.

Here is how the jam should look along the way:


1 quart of Concord Grapes, about 1.75 lbs
When skinning the grapes no tools are needed.  Simply squeeze the grape.  The skin will crack and the inside will come out.  It is not like skinning an apple.  It is simple.  Save any liquid that comes out with the pulp and use it in the jam as well.


Skin the grapes

You should have 2 bowls that look like this:

One bowl with skins


One bowl with pulp (inside of grapes and seeds)
Take skins and 1/2 cup sugar:


Process:


Place the pulp, remaining sugar, lemon juice and processed seeds in a pan and cook for 2 minutes:


Remove from the heat and pour into a fine strainer over a bowl.  Be careful, this is hot.


Push the mixture through the strainer until there is only seeds and thick pulp left.


Scrape bottom of the strainer to get the last of the jam mixture into the bowl. You do not want to use the same one you used in the strainer because it has seeds and skins on it that you do not want in your finished jam.  Mix up the jam in the bowl.


The mixture should be thick.  It is now ready to put in jars and process for 10 minutes in a water bath canner.  Process for 10 minutes.  Remove and store.


This is an easy to make jam.  Use it like you would any other grape jam.  If you buy more grapes, it is OK to double or triple the recipe.