Sunday, December 29, 2013

Lasagne

My husband often says that I do not make lasagne. My response is that it takes a long time.  Also, he likes meat in it and I do not - that is way too much work for something I will not eat.  But I have found a solution to this issue and it is called fresh lasagne sheets.  I found the fresh lasagne sheets at my local Uncle Guisseppe's and I knew this was the way to go.  Before this, the only way to make lasagne was to make homemade lasagne sheets or to use dried pasta that has to be boiled and drained.  Since I always have homemade tomato sauce on hand this recipe was easy to make and it came out great - even with the meat the hubby wanted.  Even I ate it!  In my photos I am using 2 small aluminum trays that are each a half of a half size tray.  This allows me to make two dinners for four people.  The entire recipe makes dinner for eight.

Ingredients:

3 lbs bulk Italian sausage or links with the casings removed 
2 quarts tomato sauce, homemade preferred
3 whole fresh lasagne sheets 
32 oz ricotta cheese
2 eggs
1 TBS Dried Italian seasoning
Salt and pepper
24 oz mozzarella cheese, shredded
1 cup Parmegiano Regiano cheese or Asiago cheese, shredded

Here's now:

Preheat the oven to 375 degrees F.

Brown the bulk sausage in a large sauté pan over medium heat, until the pink is just cooked out, about 7 minutes. 

Remove the sausage from the pan, drain the fat out and set it aside.

Now prepare the ricotta.  Combine the ricotta, eggs, Italian seasoning, salt and pepper in a bowl, mixing to incorporate everything completely.  

Now it is time to put the lasagne together.

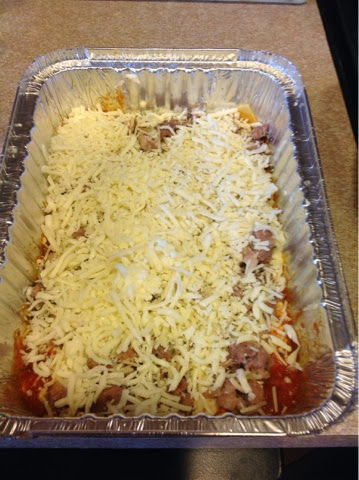
In a deep casserole dish or an aluminum half tray, pour in 1 cup of sauce and make sure the bottom is completely covered.  

Add one sheet to the tray on top of the sauce and completely cover the bottom.  Use more sheets, or pieces of the sheets if needed to cover.


Top the sheet with 1 cup of sauce and spread it to cover the sheet completely.

Top the sauce with 1 1/2 cups of the ricotta mix and spread that out completely.

Top with 2 cups of sausage.

Top with 1/2 cup of Parmegiano or Asiago.

Top with 1 cup of Mozzarella.

Coninute layering as above with a sheet of lasagne, 1 cup of sauce, 1 1/2 cups ricotta mix, 2 cups sausage, 1/2 cup Parmegiano or Asiago and 1 cup Mozzarella.


Top with a lasagne sheet.

Top this last sheet with. 1 cup of sauce, then 1/2 cup Parmegiano or Asiago and 1 cup of Mozzarella.

Cover the pan with aluminum foil.

You can stop here and refrigerate or freeze the lasagne for later.  Defrost the lasagne for baking if freezing.

Place in the oven on a cookie sheet (to protect the oven from spill overs and to support of the bottom of the pan).  

Bake for 15 minutes.

Remove the foil and then continue baking for 30-45 minutes until the sauce is bubbling and the lasagne is hot in the middle.  If it gets to browned on top, cover with the foil again.

Remove the lasagne from the oven and let it sit for at least 15 minutes to let it set up.  

Serve with extra sauce on the side.

Sunday, December 1, 2013

Christmas Tree 2013 - Woodland Themed Christmas Tree

Each year I do a different theme for my Christmas tree.  This year I chose Woodland.  The tree has a bird house as the topper, cranberry garland, pine ones intersparsed, leaf ornaments, deer antler ornaments and woodland creature ornaments like birds and bears.  I also only use white lights, I think it makes the decorations the star and not the lights.  I buy my ornaments after Christmas when they are up to 90% off so it does not cost me a lot of money to do the different themes.  Here are some pictures and how to ideas.

I star with a ribbon that goes with the theme.  Here the red gives it a pop of color and the green gives it a natural feeling.  The birdhouse as the topper gets the theme going.


Next I add the cranberry garland in between the ribbon.  This adds the natural feeling as well as bringing in more red. 

Next I add some sparkling things that you can get at the craft store like glettered twirls, flowers, sprays, berries, etc.


Next I added some butterflies on a thin wire I found at the craft store.


Then I added some ceramic ornaments in the shape of leaves.  I like to use some large items like these to have a repeated Patterson the tree, this prevents it from looking cluttered.  You want some repetition to make it cohesive.  


Lastly, I add the ornaments that are varied: birds, bird houses, acorns, pinecones, dear antlers, bears bridnesrs and other woodsy items.


Then I step back and make sure everything is evenly spaced and there are no blank spaces.  Overall, I am happy with how it came out.


Wednesday, November 27, 2013

Thanksgiving Dinner - Apple Herb Brine

I like to brine my turkey for Thanksgiving.  It adds juiciness and flavor to the bird, and it is so easy.  I like to use the flavors from the dinner into the brine - apple juice from the stuffing; thyme, rosemary and sage from the herb butter and stuffing; onion from the gravy.  You can use your favorite flavors for the brine but make sure you use the salt and sugar, this is what helps with the moisture in the meat.  My turkey is 18 pounds but this can be done with any size bird or even a turkey breast.  Just make sure you have a large enough container and that you cover the bird completely.  I use organic herbs, sugar and spices but you can use conventional too.  If you do not have fresh herbs you can substitute dried, use about 1 TBS per bunch.  If you have only fresh, use 1 bunch per tablespoon.  This recipe uses both fresh and dried.

Ingredients:

Large bucket
3 cups boiling water
1 cup kosher salt
1/2 cup sugar, white or brown is good
1 bunch fresh sage
2 bunches fresh thyme
1 TBS black peppercorns
6 Bay Leaves
1 TBS dried Rosemary
1 TBS granulated garlic
1 TBS onion powder
4 cups apple juice or apple cider
Ice cubes
Turkey
Water

Here's how:

Boil the water.

Place all the ingredients except the apple juice, ice and water into the container.

Pour the boing water into the container.  Stir and make sure the salt, sugar, onion and garlic are dissolved into the liquid.

Add the ice and juice.  Make sure the liquid is cold again.  If not, refrigerate it until it is.  Do not add the turkey while the liquid is still hot.

Once the liquid is cooled, add the turkey.  You add the water after the bird to make sure you do not overflow the container.

Cover completely with water and refrigerate over night or to two days.

When it is time to roast the turkey, remove the turkey from the brine and discard the liquid.

Completely dry off the outside of the bird before you roast it to get a crisp skin.


Monday, November 25, 2013

Brussel Sprouts with Bacon

A recent trip to a farm stand where I bought an entire stalks of Brussel Sprouts for $2 inspired this dish.  I had some bacon from my meat CSA on hand and a simple but flavorful side dish was created.  This recipe is great for Thanksgiving or any time you have some fresh sprouts on hand.  Try this and you will never eat those frozen sprouts again.

Ingredients:

1.5 lbs Brussel sprouts, cleaned and cut in half
4 slices bacon, cit into 1/4 inch pieces
1 cup water

Here's how:

Heat a large pot of water to a boil and add the sprouts.  Boil for 5 minutes.

Strain the sprouts and let the. Set aside.

Heat a large sauté pan to medium heat and add the bacon.

Sauté the bacon until the bacon is crisp and the fat is rendered out, about 7 minutes.

Remove the bacon and set it aside.

Add the sprouts into the pan with the bacon fat and sauté the sprouts until they are just browning.

Add the cup of water and scrape the bits off the bottom of the pan.  Cook off the water.

Turn off the heat.  Add the bacon to them pan. Toss the sprouts into the bacon and serve.

Sunday, November 24, 2013

Short Ribs

My CSA meat share contained short ribs this season.  My local butcher also had some great ones, so I added them together and came up with this recipe.  Many of the veggies are from the local farms as well.  This recipe is best made in a Dutch oven.  The preparation is easy but the cooking takes some time.  Make this recipe when you will be home on a cold day and your belly will be warmed.  This makes enough for 6 adults.  I serve it over egg noodles.  I also use all organic ingredients.

Ingredients:

1 TBS to live oil
5 lbs beef short ribs 
Salt and pepper
1 large ion, large diced
5 carrot, diced into 1 inch pieces
5 celery stalks, cut into 1 inch pieces
4 garlic cloves, whole, skin removed
2 cups red wine
6 cups beef stock, organic and homemade preferred
1 28 oz can tomato purée
1 TBS Italian seasoning
2 bay leaves

Here's how:

Preheat the oven to 350 degrees F.

Heat a large Dutch often on the stove with 1 TBS olive oil, until it gets glossy and hot.

Season the short ribs with salt and pepper on all sides.

Add the meat to the pan and brown on all sides, about 2 minutes per side.  You may need to do this in two batches to prevent steaming and get a good browning.
Remove the meat from the pan and set aside.

Add the onion, carrot, celery and garlic to the pan where you browned the meat and sauté for 5 minutes.

Add the wine and use a wooden spoon to scrape off all the brown bits from the bottom of the pan.  This is where the flavor is.  Cook the wine down by half.

Add the tomatoes, stock, Italian seasoning, bay leaf, 1 TBS salt and 1 tsp pepper.  Stir to combine.

Nestle the meat into the sauce.

Place the lid on the pot and place it into the oven for 3 hours.

Check that the meat is tender and almost falling off the bones.  Remove it and set it aside.  Remove the bay leaves and skim off any fat that has accumulated at the top.

Using your immersion blender, blend the sauce until smooth to create a sauce.  This sauce can be served on top of noodles or it's poured over the meat.


Heat again on the stove to thicken, about 3 minutes.

Add the meat back in and serve.

Serve over egg noodles and with a great vegetable, like Brussels sprouts.