Sunday, January 27, 2013

Green Living Tip #8 - Make Compost

This tip is pretty easy.  Stop throwing away your food items and yard waste.  Instead, turn it into compost which can be used in your garden.  Composting also helps to reduce the amount of garbage you put into the trash stream and into your local landfill. 

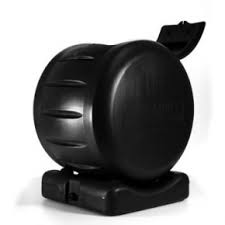
There are many ways to make compost  - bins, piles, pits etc.  I use two bins.  One is a tumbler type and the other is just a passive bin.  This allows me to have one bin that is rolling and breaking down and then, another bin to store the extras that I am not adding to the rolling one.  The second one is starting to break down but not as fast as the other one.  The reason for the two is that if you keep adding to the rolling one you will never have a complete batch because you are always adding to it. You need to fill the bin, stop adding and let it breakdown completely, empty it and then start over.  That is why the second bin is helpful, so you always have more to add when the first bin is done.



There are plenty of website that can help you learn how to make compost: 

http://howtocompost.org/
http://www.wikihow.com/Compost
http://eartheasy.com/grow_compost.html

The basics are to have the proper ratio of 1/3 "green" to 2/3 "brown" items and to turn the pile to put oxygen into it.  The pile will generate heat and the heat from the air will help it break down.

Brown items are:

Fall leaves
Pine needles
Twigs, chipped tree branches/bark
Straw or hay
Sawdust
Corn stalks
Paper (newspaper, writing/printing paper, paper plates and napkins, coffee filters)
Dryer lint
Cotton fabric
Corrugated cardboard (without any waxy/slick paper coatings

Green items are:
 Grass clippingsCoffee grounds/tea bagsVegetable and fruit scrapsTrimmings from perennial and annual plants
Annual weeds that haven't set seed
Eggshells
Animal manures (cow, horse, sheep, chicken, rabbit, etc. No dog or cat manure.)
Seaweed

Turning the pile adds oxygen to it.  If you have a bin that spins, just turn it.  If you don't want to have a bin and just want a pile, that is ok too.  Just use a pitch fork to turn it over.  If you choose not to turn the pile, that works, it just takes longer.  If you use a spinning bin and have the right ratio, you can have complete compost in one month in the warmer months.  In the winter, it doesn'tbreak down as fast because you also need some heat to make it break down.  But, keep adding the pile or bin in the winter.  It will pick up in the spring and summer.

Once the compost is done, add it to your garden - either vegetables or perennials.  It adds nutrients to the soil and also helps to amend the texture of the soil.  It is free, safe fertilizer.

In order to make composting easier, I keep a small compost bin in my kitchen under the sink. When I cook, I put the scraps into the bins and then dump that when its full into the outdoor bin.  Here is my bin from the Gardener's Supply Company.
                                                               Odor-Free Compost Pail

No matter what you do, just compost.  It reduces trash in the trash stream, helps the garden and is good for the earth.

Friday, January 25, 2013

Green Living Tip #7 - Use Paper Bags

                                                                        Recycled Kraft Flat Handle Grocery Bag
I know I have written in previous tips that you should use re-usable shopping bags.  But I also know that sometimes, you don't have them with you.  My tip for how to deal with this is to ask for a paper bag. 

When I get a paper bag at the grocery store, I do not let that bag go to waste.  In my town, we recycle paper and cardboard on Wednesdays. I use the paper bags from the grocery store as the bag to recycle my junk mail, newspapers, catalogues and magazines. I place one of the paper bags next to my garbage can to make recycling easy.  When sorting the mail, I place all of the junk mail, etc, into the paper bag.  This does two things for me. First, it makes recycling easy because I have something to put the paper items into - and its free. Second, it prevents these items from going into the trash can because the paper bag for recycling is next to it; it reminds me to recycle!

If I get a small paper bag at the pharmacy or deli, I try to re-use it for lunches or I place it into the paper recycling bag next to the trash can. 

As you can see, you can turn a moment of forgetfulness into a resource for other green living techniques- recycling.

Wednesday, January 23, 2013

Green Living Tip #6 - Use Re-Usable Shopping Bags

                                                
I know that many of you already know you should bring your own bags with you when you go to the grocery store.  They even give you a few cents off per bag to encourage it.  If you don't do this, you should.  It keeps all of those bags out of landfills, cuts down on litter and saves you money. 

If you do remember to use the bags at the grocery store, do you remember to use them when you go to the pharmacy?  Discount store?  Mall?  I bet you don't. 

I know that you may not want to use the bags that you use for food to bring home your new jeans.  That's OK, just use some bags for food and other bags for clothing and other items.  Also, remember to wash out your grocery bags when you empty them to keep out bacteria.

Now, how to do you remember to bring the bags with you to the store?  I always keep my bags in the trunk of my car so they are always with me.  You can also keep them on the front seat or back seat so you see them.  Another trick is to keep them in the car in the same place that you put your purse (if you are a woman) so when you get out of the car you can grab the purse and the bags at the same time!

I keep one large re-usable bag in the trunk and put all of the other re-usable bags inside of it. This way they are all in one place and don't take up too much room. 

Tuesday, January 22, 2013

Osso Buco in the Slow Cooker

A trip to Arthur Avenue in the Bronx inspired this recipe.  The meat market there had some beautiful looking Osso Buco meat and I had to get it.  Of course, I had no recipe for it at home but I knew I would come up with something.  After doing some Internet searches and looking in my own cabinets, I came up with this recipe.  It contains the traditional ingredients plus a few things that I added to make it my own.  I also decided to make this in the slow cooker.  It allows me to make this slow cooked recipe on a weeknight.  This recipe can be made in the oven by placing all the ingredients into a pot with a lid instead of the slow cooker and bake in the oven at 350 degrees F for 2 hours.

Ingredients:

4 large Osso Buco veal shanks
1/2 cup flour
2 TBS olive oil
10 oz sliced mushrooms, I used Baby Bellas
7 small or 3 large carrots, cut into 1/2 pieces
3 celery stalks, cut into 1/2 inch pieces
1 onion, cut into 1/2 pieces
2 14 oz cans diced tomatoes
3 large or 6 small whole cloves of garlic, skins removed
3 TBS fresh parsley, largely minced
1 TBS dried Italian seasoning
2 Bay leaves
2 tsp kosher salt
1/2 tsp black pepper, freshly cracked
1 cup red  wine
1.5 cups chicken stock

Here's how:

Coat the veal shanks in the flour.  I use a paper bag to do this. Place all the ingredients into the bag and shake.


Heat the oil a large saute pan.

Shake the excess flour off the shanks and place them in the pan to brown.  Brown them on all sides,
including the sides, for 2 minutes per side.


While the shanks are browning, set up the slow cooker.

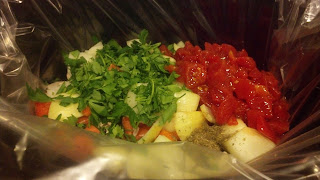
Place the mushrooms, carrots, celery, onions, 1 can of the tomatoes, garlic, parsley, Italian seasoning, Bay leaves, salt and pepper in the bottom of the slow cooker.  Mix it all up.


Remove the shanks from the pan and nestle them into the vegetables in the slow cooker.


Add the wine and stock to the saute pan where the shanks were.  It will bubble up .Scrape the bottom of the pan to get the browned bits off. Simmer for 5 minutes.


Pour the wine over the top of the shanks in the crock pot.

Pour the second can of diced tomatoes over the top of the shanks.


Turn the cooker on high for 4 hours or low for 8 hours.

Remove the shanks from the cooker and serve over polenta, egg noodles, rice or couscous with the sauce poured over top.

Monday, January 21, 2013

Green Living Tip #5 - Use Compostable Paper Plates

                                          
                                              Classic White™
My last Green Living Tip discussed kicking the disposable plate habit.  One of my suggestions was to use compostable plates during parties.  I know that some people may not be willing to or able to stop using disposable plates for everyday use.  My suggestion is, if you must use paper plates, use a compostable one. 
 
I know you are thinking that I am suggesting something crazy.  You are thinking that they are costly and hard to find. Wrong!  They are found right in your local Costco.  Chinet makes compostable plates and you are probably already using them.  Check those plates in your cabinet to see. This is the what they look like:
                                               
Many other common companies are selling them too - Solo and Hefty among them.  You can find these brands in your local grocey stores, Whole Foods and local discount stores too.  If you just look at the packaging you will be pleasantly surprised.
 
Now that you know, start putting those plates into your compost pile instead of the trash.  It will help the environment by having less trash going into landfills and it will help your garden by making you more compost.  It's a win-win.

Friday, January 18, 2013

Green Living Tip #4 - Stop Using Paper Plates and Plastic Cups

                                          
Three years ago I decided to kick the paper plate and plastic cup habit.  I used to go to the big box store to buy them. They were a part of my regular grocery list, like milk and eggs.  They are expensive to purchase, but it is more than the actual cost that made me stop using them.  The amount of trash that my house was generating was ridiculous.  When I started to realize that much of the trash we were creating was from disposable plates and cups, I knew I had to do something about it.  The thought of all of that garbage going to the waste stream make me cringe.  So what did I do? I decided to use those lovely plates and glasses sitting in my cabinets!  Not only was it free for me to use the items I already own, but I was saving lots of money by not purchasing plates and cups. 

At first, the transition was hard.  We now needed to wash more dishes either by hand or run the dishwasher more often.  But once we got used to not using them, kicking the habit was easy. What made it even easier was the fact that there were no more plastic cups or paper plates in house, so we had no choice but to use the glasses and plates sitting in the cupboard.  We are now used toit and we do not regret changing over.  Not only do we have more money in our pockets, but we take the trash out less too.  We save more money on trash bags too because we fill them up less often too!

Once we were used to not using plastic it became a part of our life and we never thought about it again...until we had house guests.  When my parents came for visits they would ask me where the cups and plates were.  When I showed them the cupboards, they said that they meant the paper cups.  I realized that the habit began when I was a kid and that is what we used at home. I had gotten this disposable lifestyle from my parents!  I tell my parents that we are Eco-friendly at our home and do not use disposable plates and cups. I have come home from work during a visit with my parents to find that they went shopping and picked up some disposable items.  But, I tell them again and ask them to please use the "real" plates and cups. It is not easy raising parents!

I admit that when I have a BBQ in the summer, that using my "real" cups and plates is not realistic - I don't own enough for parties of 30 people. My solution to that trouble is to use compostable or recyclable plates and cups. This way, I am being Eco-friendly and not spending the time I am supposed to be enjoying my guest washing dishes at the sink.

It is not hard to try to live a greener life.  Making small changes in your life can make a big impact.  When I think about how much my household has reduced its trash impact and then think about how much more we can reduce if every household in my town did the same, I am amazed.  So, I am asking you to make this change too.  While you are at it, ask your neighbors to do it to.  Not only will you help the environment but you will save money too.
 

Thursday, January 17, 2013

How to Clean and Cut Kale

Kale is the new hot super food.  It is a vegetable that can be grown in cold weather so it can be planted in the early spring and into the late fall.  Kale tastes even better after being exposed to a frost.  However, many people do not now how to cut it up for use.  Here is how I do it.

Run the kale under running water to get all the sand and grit off of it.

If it is still attached to the base, cut that off so you have individual stems.

Remove the tough center stem from the leaves.  You can use a knife and cut each side or use your hand to pull off the leaves.


Place the leaves on the cutting board and cut it into slices.


Use the cut up kale in soups, stews, as a side dish on its own, in a green juice or freeze it for later use.

Wednesday, January 16, 2013

Green Living Tip #3 - Re-usable Coffee Cups


Use a re-usable cup when you have a drink coffee at home or work.  I admit that this is one thing that I am not so good at doing.  I do not own a re-usable cup for iced coffee, like the one in the  second image (but I do recycle the disposable ones I get).  One of my goals for better Green Living in 2013 is to buy and use one.  If you drink hot coffee, please get yourself one of the cups in the first image.  Those paper cups you get at your favorite coffee shop are not recycled by you, are they?  Think of all those cups going into the garbage everyday!  All of those cups can be removed from the trash stream by you making one simple change: Buy and use a re-usable coffee cup.

Tuesday, January 15, 2013

Green Living Tip #2 - Recycle Plastic Coffee Cups

                                                                       
I am an Iced Coffee Drinker.  Everyday I get a cup at my local coffee place.  I end up with a plastic cup with a straw and plastic lid.  The same is true for those of you who get plastic cups for your soda at the fast food restaurants.  Did you know that those plastic cups are recyclable?  The lid and straw go into the trash, but that cup goes in with your plastic bottles and aluminum cans.  Don't throw it away, take it home and recycle it.  If I got one cup everyday, that is 365 cups that can be recycled. If you are like me and use these cups, be like me and recycle them.  Keep these cups out of our garbage stream.


Monday, January 14, 2013

Green Living Tip #1 - Re-Use Plastic Bags

I decided that my New Year's Resolution this year was to live a more Eco-friendly life.  In order to do this, I decided that I would try to come up with Green Living Tips to share here on the blog.  I am just a regular person who wants to live local, support organic farms and be kind to the Earth.  This is my way of telling you of simple ways to incorporate green living into your life.

I admit it, sometimes, I forget my re-usable bags.  So, that means, when I go to the stores, I get those plastic bags to carry home my items.  I have come up with a way to re-use those plastic bags that is good to the environment and the pocketbook.  I use grocery store plastic bags as trash can liners in my bathroom, office and any other place there is a small trsh can.  I place the bags in the bottom of my small trash cans so I always have a bag to use when I take the trash out.  The method is simple - come home from the store, put the bag into the bottom of the trash can, use one bag as the liner for the week.  When the bag gets full, tie it up, toss it out and you have a ready supply of trash can liners.  They are free and this method is Eco-friendly.


Sunday, January 13, 2013

Christmas Tree 2012 - Maroon and Gold

I decorate my Christmas Tree in a different theme each year.  2012 brought one inspired by my Alma Mater, Boston College, and its Maroon and Gold school colors.  You can do your own Alma Mater tree just substitute your own colors for those here.
 
It all starts with a tree that is covered in white lights.

The wrap the tree in wired maroon ribbon edged with gold.  Wrap the tree horizontally and space it evenly.


I next begin with small gold ornaments in the shape of instruments to honor the marching band.
 
Then I add gold glittered reindeer, birds and snowflakes to add some sparkle.  You can use anything you like with a glittery look.


Next, I start placing the balls.  I place 3 balls on one hook in order to make them look bigger, take up ore space and make the tree look fuller.  I do not do this for the huge balls.  Use a mix of shiny and matte ornaments.


Once the ornaments are on, I start to use floral store things to fill it, add texture and make it unique.  I use maroon poinsettias, twirly sticks, gold baby's breath and anything else that fits the theme.


Here is how it looks when it is all decorated.


To finish it off, add and angel or star.  I have an angel wearing a maroon dress.  Place a tree skirt at the bottom and you are done.   Go Eagles!