Saturday, May 28, 2011

Homemade Strawberry Rhubarb Ice Cream

What says "summer" more than ice cream?  How about Strawberry Rhubarb Ice Cream made with your own strawberries and rhubarb.  I created this recipe because I love the combination of these two ingredients in a warm crisp that I thought it must also be great cold and creamy.  This recipe is an easy one to do both organically and locally.  If you do not grown your own you can easily find strawberries and rhubarb in June at your local farm stand or grocery store.  If you can get them organically grown, even better.  If you can get local dairy (around here it is Ronnybrook) and organic then you are well on your way to a great summer treat.  You can easily use organic sugar in this recipe, but it is not local here on LI.  Try making your own ice cream using any seasonal fruit and you will not be disappointed.  This recipe fits in the 1.5 quart Cuisinart Ice Cream Maker.

Special Equipment:

Cuisinart Ice Cream Maker, 1.5 Qt
Food Processor or blender

Ingredients:

1/3 cup water
2 cups rhubarb, sliced
2/3 cup sugar, divided
2 cups strawberries, hulled
pinch salt
3/4 cup milk
1 1/2 cup heavy cream
1 1/2 tsp vanilla extract

Here's how:

The night before you are going to churn, place your ice cream bowl in the freezer.

Combine 1/3 cup water, rhubarb and 1/3 cup sugar in a small sauce pan.  Cook on medium heat, about 15 minutes until the rhubarb mixture is like a jam and the rhubarb has dissolved.
Sugar, water and rhubarb in the pan

After 15 minutes
Place the strawberries and rhubarb into the food processor and process until the berries and rhubarb are smooth.
Rhubarb and strawberries

Pureed and ready for the next step
In a medium size bowl or in your stand mixer, place 1/3 cup sugar, pinch of salt and milk and whisk for 1 minute, until the sugar dissolves.
Milk, salt and sugar whisked together
 Add the cream and vanilla and whisk again for 30 seconds.
Cream and vanilla whisked in
 Pour the fruit mixture into the cream and whisk together.
Fruit added to cream and milk

All whisked together
Place the mixture in the fridge at least two hours but preferably overnight.

Ready for the fridge.  I use a pitcher to store it (covered) so that it is easier to pour into the ice cream maker.
 Pour the mixture into the ice cream maker and churn for 10-15 minutes, until it is creamy and thick.  You can eat it now as a soft serve or place it in the freezer for a harder consistency.
Just into the ice cream maker.
Out of the maker.  I place it in the fridge for a harder ice cream

Wednesday, May 25, 2011

Last Winter Share CSA Pickup 2011

GARDEN OF EVE VEGETABLE SHARE 5/8-5/9/10

1 bu collards ($3)

1 bu sage herb ($1.50)
1 bu parsley herb ($2)
1.5 lb spinach ($9)
1 bu brocoletti ($3)
.5 lb Russian Kale ($4.50)
1 bunch baby onions ($3)
.5 lb pea shoots ($6)
potatoes ($2-$4)
3 dozen Eggs ($15)

TOTAL VALUE GARDEN OF EVE SHARE: $47.00

Sunday, May 22, 2011

First Harvest of 2011

This weekend I found myself in the vegetable garden again.  I planted seeds several weeks ago and left the bed to grow on its own.  While I was busy cleaning out the perennial beds, making baskets and pots full of annuals and focusing on the seeds indoors, my vegetable seeds were growing....as were the weeds.  I went out there this weekend and saw weeds taking over my peas and root veggies. It was hard to see the shallots, leeks and rutabaga tops amongst the weeds.  I also noticed that my radishes were bulging out of the ground.  Could it be that they were ready to be picked.  YES!  I pulled about a dozen radishes and had them in the salad from dinner.  I also weeded the beds with extreme care.  The tops of some of the veggies are so small and delicate. 

First harvest for 2011
My peas and green beans are growing up their supports and my herbs are getting big.  My chives have purple flowers on them and my strawberries already have small fruit on them.  June will find me full of strawberries - I cannot wait for the ice cream, pies and eating them straight from the plants, still warm from the sun.  I may be a bit sore from all of the garden work this weekend but the literal fruits of my labor are already finding their way to my table.

Wednesday, May 18, 2011

Chorizo Sausage and Green Vegetable Soup

Once again I found myself with a lot of green veggies from my CSA box.  I love to make soup with these greens and a slow cooker is my favorite way to do it.  This recipe is simple and make a delicious soup.  It can be made on the stove but the slow cooker is an easier method.

Ingredients:

4 green onions, chopped, about 1/2 cup
6 cups leafy greens, such as spinach or kale, in any combination, chopped
4 cups collard greens, chopped
1 cup carrots, chopped
1 cup rutabaga, or turnips, chopped
1 Bay leaf
1/2 tsp dried thyme
3 inch cheese rind
12 cups chicken stock
1 lb Chorizo, sliced into 1/2 inch pieces.  You can use any other kind of sausage you like.

Here's how:

Place all of the ingredients into the slow cooker.

Veggies in the cooker
Heat a small saute pan to medium high heat.  Place the Chorizo into the pan and saute for 10 minutes, until it starts to brown and lets off some fat.

Raw Chorizo in the pan

After 10 minutes, ready to go into the soup
Add the Chorizo and fat into the soup. 

Everything ready to cook
Turn the slow cooker on to high for 5 hours or low for 8, until the greens are soft and the flavors have combined completely.

Serve with crunchy bread on the side, eat and enjoy.

Tuesday, May 17, 2011

Asparagus and Goat Cheese Frittata

A great way to enjoy the fresh foods of the season is a frittata.  It is a quiche without the crust and a great canvas for almost anything.  I bought some fresh asparagus at the farmer's market, had some fresh eggs from my CSA basket and chives growing in the garden.  All I had to buy was some goat cheese and I had this simple recipe.  If you like the fresh flavors that spring brings, try this simple recipe.

Ingredients:

1 lb asparagus, cut into 1 inch pieces
10 eggs
1/2 cup milk
3 oz. goat cheese, broken in to small pieces
1 TBS Chives, or any other fresh herb
salt and pepper to taste
non-stick spray

Here's how:

Preheat the oven to 375 degrees.

Boil a small pot of water.  Add salt.  Toss in the asparagus and cook for 3 minutes.  Drain and set the asparagus aside.
Asparagus cut into 1 inch pieces
Cooking the asparagus
In a large bowl, whisk together eggs and milk.  Add in goat cheese, chives, salt and pepper.

Spray a large non-stick frying pan that can be put in the oven with non-stick spray and heat until hot. 

Pour in egg mixture and cook on the stove for one minute.  Use a rubber scraper to mix it up.

Ready for the oven
Place the pan into the oven for 25 minutes, until the eggs are set and slightly browned.

Let cool for 5 minutes then cut and serve.

Done and ready to eat!
This can also be served at room temperature.  Store leftovers in the fridge and microwave to reheat.

Monday, May 16, 2011

Smoked Chicken Sandwiches

My new cooking toy for this year is my smoker.  I bought a Brinkman for $38 at a local big box store.  I put it together in less than one hour and seasoned it before the first use by following the directions.  I decided to make a chicken in the smoker as my first food because it takes the least amount of time and the meat is pretty cheap.  I made 2 chickens for 5 people and had one chicken too many.  This is an easy recipe and if you want to try smoking meats, this is a great way to begin.

Serves 5

Ingredients:

1 4-5 lb chicken, whole
1/2 -3/4 cup of your favorite rub mixture (mine is below)
1 large bag charcoal
apple wood chips, soaked
3 beers
1 pitcher of water
1/2 cup of your favorite BBQ sauce (mine is below)
Hamburger buns
Cole Slaw

Rub:
http://homemadeonli.blogspot.com/2011/05/bbq-ribs-with-homemade-bbq-sauce.html

BBQ Sauce:
http://homemadeonli.blogspot.com/2011/05/bbq-ribs-with-homemade-bbq-sauce.html

Here's how:

The day before you are ready to smoke, rub the chicken with the rub and place it back in the fridge overnight.  If you want to do it the same day you can do it a few hours or minutes before.  I just think the seasoning tastes better if it sits.

When you are ready to smoke, take the chicken out of the fridge and let sit at least 30 minutes before placing on the smoker.  You do not want to put cold meat on.

Get your smoker up to temperature, about 250 degrees.  I use charcoal and start it using a charcoal chimney.  Do not use lighter fluid, it will make your food taste like lighter fluid. Place wood chips on the charcoal if you like the flavor.  I used one cup of apple wood chips, soaked for 20 minutes before adding to the coals.   If you have a water bowl for your smoker, fill it with the beers and water, until 3/4 full.

Get your charcoal started
These are the water bowl and grates for the smoker
Smoker, ready to go
Once the smoker is up temperature, place the chicken on the smoker and cook for 4 to 5 hours, until the internal temperature of the meat is 180 degrees. After 2 hours, brush BBQ sauce onto the chicken. You will have to add charcoal every hour to hour and a half to keep the temperature at 250 degrees.  Do not think that it will stay steady the entire time in a small smoker like mine.  Larger ones may be different.  Do not keep opening it or else you will lose smoke and heat.

Remove the chicken from the smoker and let sit for 10-15 minutes so the juices do not run out when you cut into it.

Chicken done
Pull the meat off the bones.
Remove the skin and use 2 forks to pull the chicken into small pieces.  Remove all the meat.

Place the meat onto a hamburger bun, top with BBQ sauce and cole slaw. 

Eat and enjoy.

Sunday, May 8, 2011

Mother's Day Weekend 2011

Mother's Day weekend seems to be the weekend that marks the beginning of the plant buying season at the stores.  I was one of those people battling for the flats and pots of annuals.  I also purchased 5 new pots that I had been eyeing for a few weeks.  They are made of foam but look like glazed pots.  They weigh hardly anything and are a beautiful red.  They look great up against my black and white house.   I also bought some new baskets with coco liners.  I filled these containers and baskets with annuals.  The look of newly planted containers really reminds me that summer is coming.  The plants are so small and seem like they are lonely in the pot.  But I know that in a few months the pots will be brimming over with these same plants.  It is amazing how quickly it all happens.

Below are some photos I took this weekend of my creations.  They still need a few filler plants to complete the look.  I will also add the plant names for those of you who want to create a similar look.  Check back soon for that info.


Tuesday, May 3, 2011

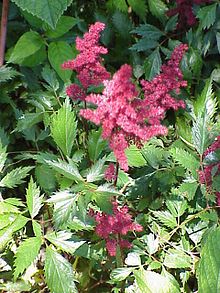
Astillbes

One of my favorite shade loving plants are astillbes.  I got my first one on a garden tour where the homeowner of one of the houses on the tour had a wheelbarrow full of plants she had divided and was giving away.  The friend I was with took an astillbe as did I.  She gave me hers when we got into the car.  Ever since then I have been dividing those two plants.  One is a smaller variety with white flowers and dark foliage.  The other is a fuller size with pink flowers and lighter foliage.  Out of those two plants I had made four small ones and five larger ones.  Today I made more.  I was able to get 8 small ones and 15 large ones. 

I have two shade beds at my home.  One is located on the north side of my house and the other is located under a large pine tree.  Under the pine tree I have hydrangea, daylillies, heuchera and some of the astillbes.  I have wanted to fill in the astillbes in that bed but I needed to wait for them to get big enough to divide and do the division before the weather was too hot.  Well, today was the day.  I was able to fill the area under the tree with the two types of astillbes and I am so happy with the way it looks.  Once these divisions fill in, the area is going to look great and the weeding will be kept down by the perennials shading the soil. 

Some species are commonly known as False Goat's Beard, and False Spirea.  They are widely adapted to water-logged conditions, and tolerate clay soils well.  Astilbes are one of the easiest perennial flowers to grow, but they give a high return. Virtually pest free, they can light up the shade garden.  Astilbe plumes bloom in June-July.

If you are looking for an inexpensive perennial that loves shade and can be divided every two to three years to make you some free plants, try the astillbe.  The foliage is beautiful, comes in many different colors and the flowers are as varied as the foliage.
This looks like my small, dark foliage variety

Here you can see the flowers of different varieties
This one looks like my pink flowered, light colored variety

Easter Brunch - Martha's Herbed Biscuits

I love Martha Stewart's recipes.  I watched her new show "Martha Bakes" and had to make these biscuits for Easter Brunch.  They have the fresh flavor of the early chives in my garden and dill I bought from the market.  The flakey texture of the biscuits was exactly what a great biscuit is supposed to be.  I used these for butter and jam, but they would be great for an egg sandwich or as a dinner biscuit.  These biscuits are not my recipe but are so good, I had to tell you about them.

Ingredients

4 cups all-purpose flour, plus more for kneading
4 teaspoons baking powder
1 tablespoon sugar
1 heaping teaspoon coarse salt
1 teaspoon baking soda
1 cup (2 sticks) unsalted butter, cut into 1/2-inch pieces, chilled
4 tablespoons mixed chopped fresh dill and chives
1 1/2 cups buttermilk, well shaken, plus more for brushing tops

Here's how:

Preheat oven to 450 degrees with racks set in the upper and lower thirds of the oven.

Line two baking sheets with parchment paper; set aside.

In a large bowl, whisk together flour, baking powder, sugar, salt, and baking soda.

Transfer half of the dry ingredients to the bowl of a food processor. Add butter and pulse until the mixture resembles coarse crumbs, with some larger pieces still remaining. Return this mixture back to the bowl with the rest of the dry ingredients. Add herbs, if using, and stir to combine.

Make a well in the center and gradually add buttermilk, stirring with a fork or wooden spoon until large clumps form; do not allow a dough to form in the bowl.

Turn mixture out onto a lightly floured work surface, and using lightly floured hands, knead two or three times just until a dough forms.

This is how it looks when you dump it out
Pat dough into an 8-by-8-inch square.

Using a sharp knife, cut 2-inch square biscuits, or use a 2-inch round cutter, and transfer to prepared baking sheet, spacing 2 inches apart.

Biscuits cut into pieces
Brush tops with buttermilk.

Transfer to oven and bake until golden brown, about 12 minutes.

Monday, May 2, 2011

BBQ Ribs with Homemade BBQ Sauce

BBQ ribs...what is more summer cook out than that?  But not everyday, at lease on Long Island, is a day for a BBQ.  I love to eat ribs from the BBQ or smoker but this recipe allows me to have the flavors of summer all year round.

I used St. Louis Ribs I bought from Dine's Farms which I found at a farmer's market in Northport.  They are also available in Oyster Bay and Garden City Farmer's Markets.  Their ribs are so full of meat and the animals are pasture raised and finished and treated with respect.  The difference between Dine's and store bought is clear.  If you cannot get ribs from them, you can use any other local meats you can find. 

The rub and sauce make more than enough for this recipe with some leftover for next time, it makes enough for about 20 lbs of meat.  The method and sauce is inspired by Rory from the Next Food Network Star.  The sauce and rub can be made using organic or conventional ingredients.  The ingredients for the sauce are easier to find if you want to be organic. 

Serves 4

Ingredients:

5 lbs St. Louis style pork ribs
1 cup chicken stock
1 TBS soy sauce
1 TBS Wocestershire sauce

Rub:

1 1/4 cups brown sugar
1/2 cup paprika
2 TBS black pepper
2 TBS salt
2 TBS chili powder
3 TBS garlic powder
2 TBS onion powder
2 tsp cayenne pepper

Sauce:

1 TBS olive oil
4 cloves garlic, minced or through a press
2 cups ketchup
3/4 cup chicken stock
3 TBS soy sauce
1/2 cup brown sugar
1/4 cup molasses
3 TBS red wine vinegar

Here's how:

Make the rub by combining all of the ingredients in a bowl.

Rub the rub on both sides of the ribs, use enough to completely cover it.  Place in the fridge overnight or for at least four hours.

This is how they look going into the fridge
Preheat the oven to 450 degrees F.

Place the ribs in a large oven safe pan.

This is how the ribs look after sitting in the rub
Pour in the stock and sauces.  Cover with aluminum foil.

Place the ribs in the oven and cook for 2 hours.

While the ribs are cooking, made the sauce, recipe below.

After 2 hours, the meat should be tender and pull off the bone easily. 

Remove the pan from the oven and slather the sauce on both sides of the ribs and let sit for 10 minutes in the pan.  If you like the flavor of the grill, toss them on the grill for 5 minutes per side to get the char on them.


You can see the meat has pulled away from the bone as the bones are showing 
Remove the ribs from the pan and cut into indivudual ribs.

Serve with extra sauce on the side. 

How to make the BBQ Sauce:

Place the oil and garlic in a pan over medium heat.  Cook for 1-2 minutes until the garlic lets off its flavor but do not brown it.


Add the rest of the ingredients and mix well. 

Ingredients in, time to stir
Cook for 20 minutes until it reduces some and the flavors are combined.  The sauce can be stored in the fridge for at least a week or frozen for 3 months.  The sauce also goes well on chicken.
Done and ready for the ribs